Thursday, May 11, 2017

Apache JMeter Non-GUI Mode Summary Outputs

Apache JMeter provides 2 modes of execution.
  1. GUI Mode
  2. Non-GUI Mode (Command line mode)
It is recomended to run JMeter in non-gui mode for load testing to get optimal results. But when running JMeter in this command line mode, there is a limitation that we can't monitor test results live in run-time.

But there is a solution for it for a some extent. That is we can see a summary of test statistics on the terminal (command line), once per configured time duration. This feature is enabled by default, and if we want to change its properties, we have to do it in <JMETER_HOME>/bin/jmeter.properties file. Following are the related 4 properties in this file for this non-gui summarize outs. Last 3 properties listed below are commented out by default as the comented out values are the default values.
summariser.name=summary
summariser.interval=30
summariser.out=true
summariser.log=true
Let's see what these properties do.
  • summariser.interval - the time interval the summary outputs are generated. This is in seconds. We may need to reduce or increase this value according tho the nature of our tests.
  • summariser.out      - set this to true if you want to display summary outputs                                    on the terminal.
  • summarizer.log      - set this to true if you want to include this summary                                          outputs on the jmeter log file.

After making required changes to these properties, run your test in non-gui mode and you will see a output similar to below. Note that the summary output entries are printed line by line once a given interval of time.


Fields in the summary outputs stands for below purposes.
e.g.
summary +   1127 in 00:00:06 =  200.4/s Avg:   133 Min:    58 Max:  2710 Err:  1127 (100.00%) Active: 20 Started: 20 Finished: 0
  • Field 1 : summary = means that is a cumulative report entry
                  summary + means that is for the relevant time period only
  • Field 2 : Number of threads  (e.g. 1127 )
  • Field 3 : Time period (e.g. 00:00:06 )
  • Field 4 : Threads per second (e.g. 200.4/s)
  • Field 5 : Average response time (e.g. 133)
  • Field 6 : Minimum response time (e.g. 58)
  • Field 7 : Maximum response time (e.g. 2710)
  • Field 8 : Number or errors (e.g. 1127)
  • Field 9 : Error percentage (e.g. 100 Seems my all tests has failed :D )

Saturday, February 4, 2017

Troubleshooting some Common Errors in Running Puppet Agent

Here I am going to guide you on how to troubleshoot some common errors in running puppet agent(client).
1. SSL Certificate Error

Puppet uses self signed certificates to communicate between Master(server) and Agent(client). When there is mismatch or verification failure, following error logs may display on the puppet agent.

Error log in Agent:
 
Warning: Setting templatedir is deprecated. See http://links.puppetlabs.com/env-settings-deprecations
  (at /usr/lib/ruby/vendor_ruby/puppet/settings.rb:1139:in `issue_deprecation_warning')
Warning: Unable to fetch my node definition, but the agent run will continue:
Warning: SSL_connect returned=1 errno=0 state=SSLv3 read server certificate B: certificate verify failed: [self signed certificate in certificate chain for /CN=Puppet CA: puppetmaster.openstacklocal]
Info: Loading facts
Error: Could not retrieve catalog from remote server: SSL_connect returned=1 errno=0 state=SSLv3 read server certificate B: certificate verify failed: [self signed certificate in certificate chain for /CN=Puppet CA: puppetmaster.openstacklocal]
Warning: Not using cache on failed catalog
Error: Could not retrieve catalog; skipping run
Error: Could not send report: SSL_connect returned=1 errno=0 state=SSLv3 read server certificate B: certificate verify failed: [self signed certificate in certificate chain for /CN=Puppet CA: puppetmaster.openstacklocal]

Error log may be displayed as following too.

Error: Could not request certificate: SSL_connect returned=1 errno=0 state=SSLv3 read server certificate B: certificate verify failed: [self signed certificate in certificate chain for /CN=Puppet CA: puppetmaster.openstacklocal]

Solution:   

Following is the simplest solution. (recommended only if you are using a single Agent node).
Enter the following commands with root permissions,
1) on agent>> 
  • rm -rf /var/lib/puppet/ssl/
2) on master>> 
  • puppet cert clean --all
  • service puppetmaster restart 
Then try to run agent again and the error should have been resolved.

A more elegant solution:

Usually when you encounter this kind of ssl issue, what you can do is first delete the ssl directory in the Agent.
   
     rm -rf /var/lib/puppet/ssl/

Then try to run Agent again and then the puppet will show you exactly what to do; something similar to below..

On the master:
  puppet cert clean node2-apim-publisher.openstacklocal
On the agent:
  1a. On most platforms: find /home/ubuntu/.puppet/ssl -name node2-apim-publisher.openstacklocal.pem -delete
  1b. On Windows: del "/home/ubuntu/.puppet/ssl/node2-apim-publisher.openstacklocal.pem" /f
  2. puppet agent -t


Do what puppet says as above and start puppet agent again.

I recommend to follow this solution as so here you are not deleting all the certificates related to each puppet agent. You are deleting only the relevant agent's certificate only.


2. "<unknown>" Error due to hira data file syntax error

Error log in Agent:
Error: Could not retrieve catalog from remote server: Error 400 on SERVER: (<unknown>):


Solution:

This error log with message “<unknown>” is mostly occurred due to a syntax error in a related hiera data .yaml file. So go through your hiera data files again. May be you can use some .yaml hiera data file validation online tools to validate your .yaml files. (eg. http://www.yamllint.com/)

3.  Agent node not defined on Master

Error log in Agent:

Error: Could not retrieve catalog from remote server: Error 400 on SERVER: Could not find default node or by name with 'node2-apim-publisher.openstacklocal, node2-apim-publisher' on node node2-apim-publisher.openstacklocal
Warning: Not using cache on failed catalog
Error: Could not retrieve catalog; skipping run


("'node2-apim-publisher" is the hostname of my agent)

Solution:

This error occurs when you have not defined your Agent, in your master's related agent-node-defining  .pp file. This file exists usually in /etc/puppet/manifests/ of the Master and it's name can be site.pp or node.pp. You have to define the agent nodes using their hostnames in this file.

Sample node definition is as follows.

node "host-name-of-agent" {
 
}


Tuesday, September 27, 2016

Merging Traffic Manager and Gateway Profiles - WSO2 APIM

This guide includes how to configure a WSO2 API Manager 2.0.0 cluster, highlighting the specific scenario of merging Traffic Manager Profile into the Gateway. I will describe how to configure a sample API Manager setup which demonstrate Merging Traffic Manager and Gateway Profiles.

I will configure publisher, store and key manager components in a single server instance as the expectation is to illustrate merging gateway and traffic manager and starting that merged instance separately from other components.

This sample setup consists of following 3 nodes,
  1. Publisher + Store + Key Manager (P_S_K)                       ; offset = 0
  2. Gateway Manager/Worker + Traffic Manager (GM_T)     ; offset = 1
  3. Gateway Worker + Traffic Manager (GW_T)                    ; offset = 2
  • We will refer the 3 nodes as P_S_K , GM_T , GW_T for convenience.
  • There is a cluster of gateways, one node is acting as the manager/worker node and other one is as a simple worker node.
  • Traffic managers are configured with high availability.
  • Port offset is configured as mentioned above. To set the port offsets edit the <Offset> element in <APIM_HOME>/repository/conf/carbon.xml , in each of the nodes.

Figure 1 : Simple architectural diagram of the setup

1. Configuring datasources

We can configure databases according to the APIM documentation
https://docs.wso2.com/display/CLUSTER44x/Clustering+API+Manager+2.0.0#ClusteringAPIManager2.0.0­Installingandconfiguringthedatabases
[Please open such these documentation links in Chrome or any other browser except Firefox, as Firefox has a bug with Confluence Atlassian document links in opening the link at the expected position of the page.] 

Follow the steps in it carefully. Assume that the names of the databases we created are as follows,

       API Manager Database ­ - apimgtdb
       User Manager Database ­- userdb 
       Registry Database​ ­ ​        - regdb

In the above mentioned doc, apply all the steps defined for all three store, publisher, key manager
nodes to our P_S_K node. Because in that documentation publisher, store, key manager are existing in different nodes, but in our this setup we are using a single node which acts as all 3 components
(publisher, store and key manager).

Following is a summary of configured datasources for each node.
         P_S_K node : ​apimgtdb , userdb , regdb
         GM_T node / GW_T node​ : Not required

2. Configuring the connections among the components

You will now configure the inter-component relationships of the distributed setup by modifying their <APIM_HOME>/repository/conf/api-manager.xml files.
This section includes the following sub-topics.
  1. Configuring P_S_K node
  2. Configuring GM_T node & GW_T node


2.1 Configuring P_S_K node


Here we have to configure this node for all the 3 components, publisher, store, key manager related functionalities.

For this follow this steps mentioned in the given docs. (it is recommended not to open these links in Firefox browser ) In them, the setup is created as the publisher, store and key manager that are in separate nodes in a cluster. So follow the steps as per the requirement of yours, considering the port offsets too.


2.1.1 Configurations related to  publisher


Follow all the steps in the above wso2 documentation except the configurations for jndi.properties file. Configurations for that file should be changed as following.

This is for configuring fail over for publishing Custom Templates and Block conditions into the Gateway node.
In <APIM_HOME>/repository/conf/jndi.properties file, line,

connectionfactory.TopicConnectionFactory = amqp://admin:admin@clientid/carbon?brokerlist='tcp://<Traffic-Manager-host>:5676'
topic.throttleData = throttleData

should be changed as following.

connectionfactory.TopicConnectionFactory = amqp://admin:admin@clientID/carbon?failover='roundrobin'%26cyclecount='2'%26brokerlist='tcp://<IP_Of_GM_T_Node>:5673?retries='5'%26connectdelay='50';tcp://<IP_Of_GW_T_Node>:5674?retries='5'%26connectdelay='50''

In the above config,
5673 => 5672+offset of GM_T node
5674 => 5672+offset of GW_T node

2.1.2 Configurations related to  store

Follow all the steps appropriately in the below wso2 documentation link


2.1.3 Configurations related to key manager

Follow all the steps appropriately in the below wso2 documentation link


Note : In the above docs, setup is created as the publisher, store and key manager that are in separate nodes in a cluster. So follow the steps as per the requirement of yours, keeping in mind that you are configuring them into a single node considering the port offsets too.


2.2 Configuring GM_T node & GW_T node


Configurations for the two Gateway+Traffic Manager nodes are very much similar. So follow each below steps for both the nodes. I will mention the varying steps when required.

Please note that when starting these nodes you have to start them in default profiles as there is no customized profile for gateway+traffic manager.


2.2.1 Gateway component related configurations


This section involves setting up the gateway component related configurations to enable it to work with the other components in the distributed setup.

I will use G_T in short for the GM_T or GW_T node. Apply the IP address of the own node in the configurations below.


  1. Open the <APIM_HOME>/repository/conf/api-manager.xml file in the GM_T/GW_T node.   
  2. Modify the api-manager.xml file as follows. This configures the connection to the Key Manager component.


3. Configure key management related communication. (both nodes)

In a clustered setup if the Key Manager is fronted by a load balancer, you have to use WSClient as KeyValidatorClientType in <APIM_HOME>/repository/conf/api-manager.xml. (This should be configured in all Gateway and Key Manager components and so as per our setup configure this in GM_T and GW_T nodes)


<KeyValidatorClientType>
WSClient</KeyValidatorClientType>

4. Configure throttling for the Traffic Manager component. (both nodes). 
Modify the api-manager.xml file as follows


In the above configs, <connectionfactory.TopicConnectionFactory> element used to configure jms topic url where worker node uses to listen for throttling related  events. In this case, each Gateway node has to listen Topics in both Traffic managers. Because if one node gets down, throttling procedures should work without any interrupt. Even though one node gets down, the throttling related counters will now exist synced with the other node. Hence, here we have configured failover jms connection url as pointed above.


2.2.2 Clustering Gateway + Traffic Manager nodes

In our sample setup we are using two nodes.
1. Manager/Worker
2. Worker

We have followed the below steps for Traffic manager related clustering, and if you want to do the configurations for Gateway clustering with load balancer, follow the documentation 
https://docs.wso2.com/display/CLUSTER44x/Clustering+the+Gateway and configure host names in carbon.xml appropriately, add svn deployment synchronizer, etc.
Follow the below steps for both the nodes or Traffic manager related clustering.

Open the <AM_HOME>/repository/conf/axis2/axis2.xml file


1. Scroll down to the 'Clustering' section. To enable clustering for the node, set the value of "enable" attribute of the "clustering" element to "true", in each of 2 nodes.

<clustering class="org.wso2.carbon.core.clustering.hazelcast.HazelcastClusteringAgent"
enable="true">

2. Change the 'membershipScheme' parameter to 'wka'.
<parameter name="membershipScheme">wka</parameter>
3. Specify the host used to communicate cluster messages. (in both nodes)

<parameter
 name="localMemberHost"><ip of this GM_T node></parameter>

4. Specify the port used to communicate cluster messages.


        Let’s give port 4001 in GM_T node.

              <parameter name="localMemberPort">4001</parameter>

        Let’s give port 4000 in GW_T node.

              <parameter name="localMemberPort">4001</parameter>

5. Specify the name of the cluster this node will join. (for both nodes)

<parameter name="domain">wso2.carbon.domain</parameter>

6. Change the members listed in the <members> element. This defines the WKA members. (for both nodes)


2.2.3 Traffic manager related configurations


This section involves setting up the Traffic manager component related configurations to enable it to work with the other components in the distributed setup. 

1. Delete the contents of <APIM_HOME>/repository/conf/registry.xml file and copy the contents of the <APIM_HOME>/repository/conf/registry_TM.xml file, into the registry.xml file (in both nodes)

2. Remove all the existing webapps and jaggeryapps from the <APIM_HOME>/repository/deployment/server directory.
(in both nodes)

3. High Availability configuration for traffic manager component (in both nodes)
  • Open <APIM_HOME>/repository/conf/event-processor.xml and enable HA mode as below.
    <mode name="HA" enable="true">
  • Set ip for event synchronization
    <eventSync>
        <hostName>ip     of this node</hostName>
        .....
    </eventSync>

2.2.4 Configuring JMS TopicConnectionFactories


Here we are configuring TopicConnectionFactories to get data from to traffic manager. So in this cluster configuration we are using 2 TopicConnectionFactories (one for each), and configure to send data to both TopicConnectionFactories. (send to own TopicConnectionFactory and other node’s TopicConnectionFactory too)
So open in <APIM_HOME>/repository/conf/jndi.properties file (in both nodes) and do th efollwoing changes in it,

connectionfactory
.TopicConnectionFactory = amqp://admin:admin@clientid/carbon?brokerlist='tcp://localhost:5672'
line to following,
connectionfactory.TopicConnectionFactory1 = amqp://admin:admin@clientid/carbon?brokerlist='tcp://<ip of GM_T>:5673


And add new line as,
connectionfactory.TopicConnectionFactory2 = amqp://admin:admin@clientid/carbon?brokerlist='tcp://<ip of GW_T>:5674'

Finally that section would be as below.

# register some connection factories
# connectionfactory.[jndiname] = [ConnectionURL]
connectionfactory.TopicConnectionFactory1 = amqp://admin:admin@clientid/carbon?brokerlist='tcp://<ip of GM_T>:5673'
connectionfactory.TopicConnectionFactory2 = amqp://admin:admin@clientid/carbon?brokerlist='tcp://<ip of GW_T>:5674'


5673 => 5672 + portOffset of GM_T

5674 => 5672 + portOffset of GW_T

2.2.5 Add event publishers to publish data to related JMS Topics.

(Do this for both the nodes.) We have to publish data from Traffic manager component to TopicConnectionFactory in its own and other node too. So there should be 2 jmsEventPublisher files in the <APIM_HOME>/repository/deployment/server/eventPublishers/ for that.

There is already a,<APIM_HOME>/repository/deployment/server/eventPublishers/jmsEventPublisher.xml file in the default pack. In it, update the ConnectionFactoryJNDIName as below.


And that is it. U are done :-)

Sunday, July 3, 2016

Removing Unnecessary Menu Items in WSO2 Carbon Management console

When you are customizing wso2 products, changing its features and behaviors you might face a situation that you want to change the features provided in Carbon Management Console (Web-based user interface). And sometimes you might want to remove certain features provided default in the product.

Simple Standard Solution

In such a situation what we can simply do is removing/commenting the defined features artifacts in <product-x>/modules/p2-profile-gen/pom.xml in the product source.

In this scenario you have to keep in mind that most of the features installed in wso2 products are packed as 2 separate features namely UI Feature & Server Feature. So suppose you only want to remove the UI components provided for a certain feature, but its functionalities are still used in the server side back-end. So in such a this situation you can remove the definition of that feature's UI component in the above mentioned pom.xml file.

Use Case Example: You want to remove the "Meta Data" menu panel item from the management console home page.- Main section, as squared (in red) in the below figure.(Figure 1), as it is not required to your product or its usage.
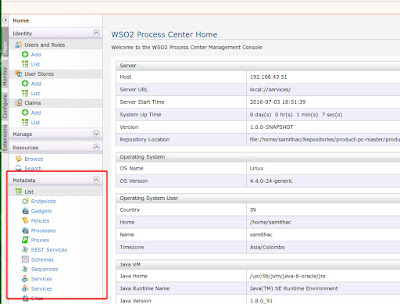
  
Figure 1

You identify that it is installed by org.wso2.carbon.governance.metadata.ui.feature. This feature is packed along with org.wso2.carbon.governance.metadata.server.feature and installed as a single feature,  called org.wso2.carbon.governance.metadata.feature. (not specializing 'ui' or 'server' indicates that both of them are installed as a whole) So if you want to remove the UI feature only, what you have to do is define only the Server feature.

So in the pom file,
1)replace,

<featureArtifactDef>
 org.wso2.carbon.governance:org.wso2.carbon.governance.metadata.feature:${carbon.governance.version}
 </featureArtifactDef>

with,

<featureArtifactDef>
org.wso2.carbon.governance:org.wso2.carbon.governance.metadata.server.feature:${carbon.governance.version}
</featureArtifactDef>

and,
2)Replace,

<feature>
               <id>org.wso2.carbon.governance.metadata.feature.group</id>
               <version>${carbon.governance.version}</version>

</feature>

with,

<feature>
             <id>org.wso2.carbon.governance.metadata.server.feature.group</id>
             <version>${carbon.governance.version}</version>

</feature>
 
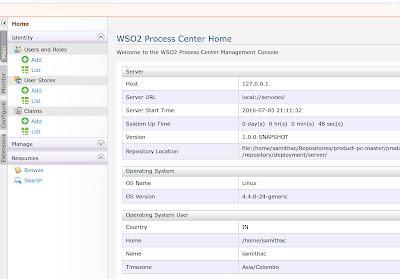
 Then rebuild the product and start the server and check. That feature related ui components (icons, menus, panels) should have been removed from the management console. But this solution is not 100% successful. While trying above example too, eventhough the feature icons under the MetaData menu items are removed, still the MetaData Collapisble Menu Heading is existing, as displaed in the below figure (Figure 2). That should be because the related server feature is still existing.

Figure2


And this solution is also not always applicable. Another feature installed into the product might be dependent on this feature. So we cannot remove the certain feature. But don't worry, there is an other solution left too.


Complex Solution by replacing the component.xml

 The appearance of the menu panel of Carbon Management Console web interface is defined in the <product-distribution-package-home>/repository/resources/component.xml. in the built product distribution package zip. The displaying menu items are defined as <menu> elements in this xml files. So we have to remove the related element and its child elements.

In our example there were 2 sub-elements of the "metadata-menu" element.

<menu>
   <id>metadata_menu</id>
   <i18n-key>component.metadata</i18n-key>
    <i18n-bundle>org.wso2.carbon.i18n.Resources</i18n-bundle>
   <parent-menu></parent-menu>
   <link>#</link>
   <region>region3</region>
   <order>30</order>
   <style-class>home</style-class>
</menu> 
<menu>
   <id>list_sub_menu</id>
   <i18n-key>modulemgt.list</i18n-key>
   <i18n-bundle>org.wso2.carbon.i18n.Resources</i18n-bundle>
   <parent-menu>metadata_menu</parent-menu>
   <link>#</link>
   <region>region3</region>
   <order>5</order>
          <icon>../images/list.gif</icon>
   <style-class>home</style-class>
          <require-permission>/permission/admin/manage/resources/govern/metadata/list</require-permission>
</menu>
<menu>
   <id>add_sub_menu</id>
   <i18n-key>modulemgt.add</i18n-key>
   <i18n-bundle>org.wso2.carbon.i18n.Resources</i18n-bundle>
   <parent-menu>metadata_menu</parent-menu>
   <link>#</link>
   <region>region3</region>
   <order>10</order>
   <icon>../images/add.gif</icon>
   <style-class>home</style-class>
          <require-permission>/permission/admin/manage/resources/govern/metadata/add</require-permission>
</menu>

So just remove or comment out those elements and restart the server. You will see that our objective is completely successful now. Even the left over MataData menu heading is removed now, as in the below figure (Figure 3).

Figure3

But this solution is not appropriate for a developer. You will have to edit that component.xml file each time you build the product. But don't worry. There is a solution. You can say your distribution pom (<product-home>/modules/distribution/pom.xml) to replace that component.xml file in the distribution product zip, with a predefined file, in which those non-required elements are removed or commented out.

This pom file does the job of packaging the final product zip. So there should be configurations on how the final product zip related directory is copied into modules/distribution/target folder. At there you can say to the maven-ant-run plugin to replace that component.xml with a predefined file which is placed somewhere in the product source by us.

Following is how this task is done in the WSO2 Process Center pre-release M2 version.

The related section in unchanged distribution pom file 

<plugin>
    <groupId>org.apache.maven.plugins</groupId>
    <artifactId>maven-antrun-plugin</artifactId>
    <executions>
        <execution>
            <id>3-extract-docs-from-components</id>
            <phase>package</phase>
            <goals>
                <goal>run</goal>
            </goals>
            <configuration>
                <tasks>
                    <property name="tempdir" value="target/docs-temp" />
                    <property name="jardir" value="target/jars" />
                    <mkdir dir="${tempdir}" />
                    <unzip dest="${tempdir}">
                        <fileset dir="target">
                            <include name="${project.artifactId}-${pc.version}.zip" />
                        </fileset>
                    </unzip>
                    <copy todir="target/wso2carbon-core-${carbon.kernel.version}/repository/components" overwrite="true">
                        <fileset dir="${tempdir}/${project.artifactId}-${pc.version}/repository/components">
                        </fileset>
                    </copy>
                    <delete file="target/${project.artifactId}-${pc.version}.zip" />
                    <delete dir="${tempdir}" />
                </tasks>
            </configuration>
        </execution>

The related section changed for the required objective in distribution pom file

<plugin>
    <groupId>org.apache.maven.plugins</groupId>
    <artifactId>maven-antrun-plugin</artifactId>
    <executions>
        <execution>
            <id>3-extract-docs-from-components</id>
            <phase>package</phase>
            <goals>
                <goal>run</goal>
            </goals>
            <configuration>
                <tasks>
                    <property name="tempdir" value="target/docs-temp" />
                    <property name="jardir" value="target/jars" />
                    <mkdir dir="${tempdir}" />
                    <unzip dest="${tempdir}">
                        <fileset dir="target">
                            <include name="${project.artifactId}-${pc.version}.zip" />
                        </fileset>
                    </unzip>
                    <copy todir="target/wso2carbon-core-${carbon.kernel.version}/repository/components" overwrite="true">
                        <fileset dir="${tempdir}/${project.artifactId}-${pc.version}/repository/components">
                        </fileset>
                    </copy>
                    <mkdir dir="${tempdir2}" />
                    <unzip 
                         src="${tempdir}/${project.artifactId}-${pc.version}/repository/components/plugins/org.
                             wso2.carbon.ui.menu.governance_${carbon.kernel.version}.jar"
                         dest="${tempdir2}" />
                    <copy file="src/repository/resources/component.xml" toDir="${tempdir2}/META-INF/"
                         overwrite="true"/>
                    <zip destfile="org.wso2.carbon.ui.menu.governance_${carbon.kernel.version}.jar" 
                         basedir="${tempdir2}" />
                    <copy                        file="org.wso2.carbon.ui.menu.governance_${carbon.kernel.version}.jar"
                        toDir="target/wso2carbon-core-${carbon.kernel.version}/repository/components/plugins/"                        overwrite="true" />
                    <delete file="target/${project.artifactId}-${pc.version}.zip" />
                    <delete dir="${tempdir}" />
                    <delete dir="${tempdir2}" />
                    <delete file="org.wso2.carbon.ui.menu.governance_${carbon.kernel.version}.jar"/>
                </tasks>
            </configuration>
        </execution>

Note that the component.xml file created by us (where those non-required xml elements are removed) is placed in src/repository/resources/ and what we are doing here is overwriting the original file with this file.

That is all. Rebuild your product and restart the server and check how you have succeeded with your objective.