Sunday, July 3, 2016

Removing Unnecessary Menu Items in WSO2 Carbon Management console

When you are customizing wso2 products, changing its features and behaviors you might face a situation that you want to change the features provided in Carbon Management Console (Web-based user interface). And sometimes you might want to remove certain features provided default in the product.

Simple Standard Solution

In such a situation what we can simply do is removing/commenting the defined features artifacts in <product-x>/modules/p2-profile-gen/pom.xml in the product source.

In this scenario you have to keep in mind that most of the features installed in wso2 products are packed as 2 separate features namely UI Feature & Server Feature. So suppose you only want to remove the UI components provided for a certain feature, but its functionalities are still used in the server side back-end. So in such a this situation you can remove the definition of that feature's UI component in the above mentioned pom.xml file.

Use Case Example: You want to remove the "Meta Data" menu panel item from the management console home page.- Main section, as squared (in red) in the below figure.(Figure 1), as it is not required to your product or its usage.
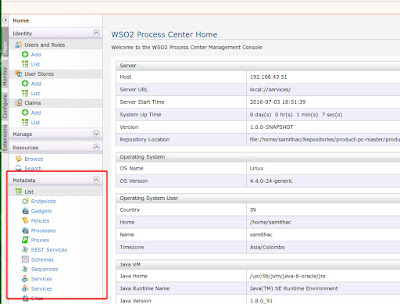
  
Figure 1

You identify that it is installed by org.wso2.carbon.governance.metadata.ui.feature. This feature is packed along with org.wso2.carbon.governance.metadata.server.feature and installed as a single feature,  called org.wso2.carbon.governance.metadata.feature. (not specializing 'ui' or 'server' indicates that both of them are installed as a whole) So if you want to remove the UI feature only, what you have to do is define only the Server feature.

So in the pom file,
1)replace,

<featureArtifactDef>
 org.wso2.carbon.governance:org.wso2.carbon.governance.metadata.feature:${carbon.governance.version}
 </featureArtifactDef>

with,

<featureArtifactDef>
org.wso2.carbon.governance:org.wso2.carbon.governance.metadata.server.feature:${carbon.governance.version}
</featureArtifactDef>

and,
2)Replace,

<feature>
               <id>org.wso2.carbon.governance.metadata.feature.group</id>
               <version>${carbon.governance.version}</version>

</feature>

with,

<feature>
             <id>org.wso2.carbon.governance.metadata.server.feature.group</id>
             <version>${carbon.governance.version}</version>

</feature>
 
 Then rebuild the product and start the server and check. That feature related ui components (icons, menus, panels) should have been removed from the management console. But this solution is not 100% successful. While trying above example too, eventhough the feature icons under the MetaData menu items are removed, still the MetaData Collapisble Menu Heading is existing, as displaed in the below figure (Figure 2). That should be because the related server feature is still existing.
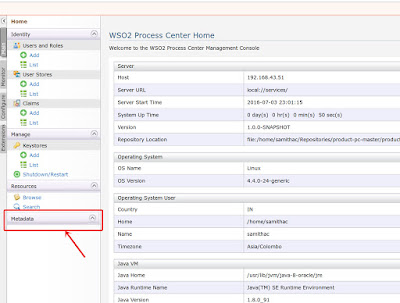
Figure2


And this solution is also not always applicable. Another feature installed into the product might be dependent on this feature. So we cannot remove the certain feature. But don't worry, there is an other solution left too.


Complex Solution by replacing the component.xml

 The appearance of the menu panel of Carbon Management Console web interface is defined in the <product-distribution-package-home>/repository/resources/component.xml. in the built product distribution package zip. The displaying menu items are defined as <menu> elements in this xml files. So we have to remove the related element and its child elements.

In our example there were 2 sub-elements of the "metadata-menu" element.

<menu>
   <id>metadata_menu</id>
   <i18n-key>component.metadata</i18n-key>
    <i18n-bundle>org.wso2.carbon.i18n.Resources</i18n-bundle>
   <parent-menu></parent-menu>
   <link>#</link>
   <region>region3</region>
   <order>30</order>
   <style-class>home</style-class>
</menu> 
<menu>
   <id>list_sub_menu</id>
   <i18n-key>modulemgt.list</i18n-key>
   <i18n-bundle>org.wso2.carbon.i18n.Resources</i18n-bundle>
   <parent-menu>metadata_menu</parent-menu>
   <link>#</link>
   <region>region3</region>
   <order>5</order>
          <icon>../images/list.gif</icon>
   <style-class>home</style-class>
          <require-permission>/permission/admin/manage/resources/govern/metadata/list</require-permission>
</menu>
<menu>
   <id>add_sub_menu</id>
   <i18n-key>modulemgt.add</i18n-key>
   <i18n-bundle>org.wso2.carbon.i18n.Resources</i18n-bundle>
   <parent-menu>metadata_menu</parent-menu>
   <link>#</link>
   <region>region3</region>
   <order>10</order>
   <icon>../images/add.gif</icon>
   <style-class>home</style-class>
          <require-permission>/permission/admin/manage/resources/govern/metadata/add</require-permission>
</menu>

So just remove or comment out those elements and restart the server. You will see that our objective is completely successful now. Even the left over MataData menu heading is removed now, as in the below figure (Figure 3).
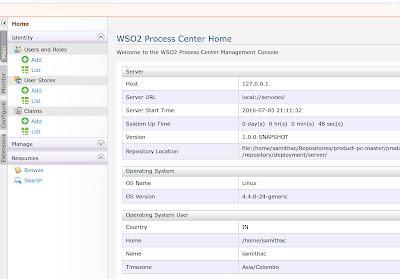
Figure3

But this solution is not appropriate for a developer. You will have to edit that component.xml file each time you build the product. But don't worry. There is a solution. You can say your distribution pom (<product-home>/modules/distribution/pom.xml) to replace that component.xml file in the distribution product zip, with a predefined file, in which those non-required elements are removed or commented out.

This pom file does the job of packaging the final product zip. So there should be configurations on how the final product zip related directory is copied into modules/distribution/target folder. At there you can say to the maven-ant-run plugin to replace that component.xml with a predefined file which is placed somewhere in the product source by us.

Following is how this task is done in the WSO2 Process Center pre-release M2 version.

The related section in unchanged distribution pom file 

<plugin>
    <groupId>org.apache.maven.plugins</groupId>
    <artifactId>maven-antrun-plugin</artifactId>
    <executions>
        <execution>
            <id>3-extract-docs-from-components</id>
            <phase>package</phase>
            <goals>
                <goal>run</goal>
            </goals>
            <configuration>
                <tasks>
                    <property name="tempdir" value="target/docs-temp" />
                    <property name="jardir" value="target/jars" />
                    <mkdir dir="${tempdir}" />
                    <unzip dest="${tempdir}">
                        <fileset dir="target">
                            <include name="${project.artifactId}-${pc.version}.zip" />
                        </fileset>
                    </unzip>
                    <copy todir="target/wso2carbon-core-${carbon.kernel.version}/repository/components" overwrite="true">
                        <fileset dir="${tempdir}/${project.artifactId}-${pc.version}/repository/components">
                        </fileset>
                    </copy>
                    <delete file="target/${project.artifactId}-${pc.version}.zip" />
                    <delete dir="${tempdir}" />
                </tasks>
            </configuration>
        </execution>

The related section changed for the required objective in distribution pom file

<plugin>
    <groupId>org.apache.maven.plugins</groupId>
    <artifactId>maven-antrun-plugin</artifactId>
    <executions>
        <execution>
            <id>3-extract-docs-from-components</id>
            <phase>package</phase>
            <goals>
                <goal>run</goal>
            </goals>
            <configuration>
                <tasks>
                    <property name="tempdir" value="target/docs-temp" />
                    <property name="jardir" value="target/jars" />
                    <mkdir dir="${tempdir}" />
                    <unzip dest="${tempdir}">
                        <fileset dir="target">
                            <include name="${project.artifactId}-${pc.version}.zip" />
                        </fileset>
                    </unzip>
                    <copy todir="target/wso2carbon-core-${carbon.kernel.version}/repository/components" overwrite="true">
                        <fileset dir="${tempdir}/${project.artifactId}-${pc.version}/repository/components">
                        </fileset>
                    </copy>
                    <mkdir dir="${tempdir2}" />
                    <unzip 
                         src="${tempdir}/${project.artifactId}-${pc.version}/repository/components/plugins/org.
                             wso2.carbon.ui.menu.governance_${carbon.kernel.version}.jar"
                         dest="${tempdir2}" />
                    <copy file="src/repository/resources/component.xml" toDir="${tempdir2}/META-INF/"
                         overwrite="true"/>
                    <zip destfile="org.wso2.carbon.ui.menu.governance_${carbon.kernel.version}.jar" 
                         basedir="${tempdir2}" />
                    <copy                        file="org.wso2.carbon.ui.menu.governance_${carbon.kernel.version}.jar"
                        toDir="target/wso2carbon-core-${carbon.kernel.version}/repository/components/plugins/"                        overwrite="true" />
                    <delete file="target/${project.artifactId}-${pc.version}.zip" />
                    <delete dir="${tempdir}" />
                    <delete dir="${tempdir2}" />
                    <delete file="org.wso2.carbon.ui.menu.governance_${carbon.kernel.version}.jar"/>
                </tasks>
            </configuration>
        </execution>

Note that the component.xml file created by us (where those non-required xml elements are removed) is placed in src/repository/resources/ and what we are doing here is overwriting the original file with this file.

That is all. Rebuild your product and restart the server and check how you have succeeded with your objective.

Sunday, June 12, 2016

Debugging Test Cases of WSO2 Products

Almost all the WSO2 product sources have Tests embedded with them. So if you build a WSO2 product (i.e. with mvn clean install terminal command) , those tests are executed. These tests are written using WSO2 Test Automation Framework which is basically using the test engine TestNG.

Anyway when we build a WSO2 product and then what if one of these Tests fail. How to find what is the actual place and what is the actual reason for the error.  By Debugging..!! eh.. But how can we debug Test cases, while building a product? Remember these tests are executed when building the product but not when running a product. Will mvn clean install -debug 5005 work ? Unfortunately no. ! Because maven is not happy to do so. ;-) 

So here is the solution. Pretty simple. We are using maven.surefire.debug property for this.
  1. Insert debug points wherever required in the test cases.
  2. Configure remote debugging in idea with port 5005 (we are using 5005 as it is the default set port)
  3. Go to <product_home>/modules/integration/<required_test_module> on terminal, and enter,
         mvn clean install -Dmaven.surefire.debug
  4. Click "Debug" button on the idea to debug with the above set configurations.
  5. That is all. Wait until the debug points are hit.
  • If u want only to debug a single test case, just uncomment others in the testing.xml
  • If u want to debug the whole "integration" module, just run above command being at that required maven module root location, in terminal. 
  • In case if the IDE debugger, displays that the debugger is "Disconnected from the target VM, address: 'localhost:5005', transport: 'socket' " or something like that message, just click on debug button, again and again until the debugging is not disconnected again but the debug points are hit.
  • If u want to go to the Carbon Management console or other web UI s , while debugging, you can go there too via the url, displayed on the terminal. (if any redirection bothers u here, u would have to address it by changing the ports and port offset values adequately )

Saturday, May 7, 2016

How to browse the "Activity" H2 database of WSO2 BPS and typical H2 databases in any WSO2 product


This guide will show you how to browse the activity database in WSO2 BPS and also the typical WSO2CARBON_DB of any WSO2 product too if you read the latter part.

All WSO2 Products are embedded with H2 database, and so there is no need of downloading h2 database separately and running it to browse WSO2 H2 database. (But remember that it can be done too).

And H2 databases are equipped with a Console Web application which lets you access and browse it using a browser.

Browse the "Activity" H2 database of WSO2 BPS

WSO2 BPS uses a separate database for its activity engine (which relate with BPMN process management) and if you are working with BPMN, and want to see the activity database, this is what you should do.

1. Open carbon.xml located in <PRODUCT_HOME>/repository/conf

2. Uncomment the <H2DatabaseConfiguration> element. (only uncomment the first 3 property elements of it as follows)

<H2DatabaseConfiguration>
        <property name="web" />
        <property name="webPort">8082</property>
        <property name="webAllowOthers" />
        <!--property name="webSSL" />
        <property name="tcp" />
        <property name="tcpPort">9092</property>
        <property name="tcpAllowOthers" />
        <property name="tcpSSL" />
        <property name="pg" />
        <property name="pgPort">5435</property>
        <property name="pgAllowOthers" />
        <property name="trace" />
        <property name="baseDir">${carbon.home}</property-->
</H2DatabaseConfiguration>


 3. Open the <WSO2_BPS_HOME>/repository/conf/datasources/activiti-datasources.xml file.

Now copy the <url> element's first part before the first semicolen (;). It would be as follows.

jdbc:h2:repository/database/activiti


4. Start the Product Server.
5. Open bowser and enter "http://localhost:8082/" (if you changed the <webport> in carbon.xml in step 2, you have to change the URL according to that)
6. Now you will see the H2 Database Console in the browser.

7. Here you have to give the JDBC URL , User Name and Password.
  •  JDBC URL : jdbc:h2:repository/database/activiti  
        (the one you copied in step 3- note that the "activity" is the name of the database in H2, you want to access)

  • User Name : wso2carbon
  • Password : wso2carbon
(Default User name and passwords are as above, but if you have editted them in activiti-datasources.xml file they should be changed accordingly )

8. Now press "Connect" and you are done. If you have successfully connected "jdbc:h2:repository/database/activiti" database will be displayed and there will be a list of database tables such as, "ACT_EVT_LOG" , "ACT_GE_BYTEARRAY", "ACT_GE_PROPERTY", etc. which are created by the BPS activity engine. You can run queries there too.

Now in the terminal you started the wso2carbon BPS server, you can see long log traces related to h2 database and if you want to get rid of them you have only to comment out or remove the <property name="trace" /> in carbon.xml in step 2. Restart the server and connect to h2 console and you will see, they have gone.

Browse typical H2 database of any wso2 product

 All the wso2 products have the typical "WSO2CARBON_DB" and if you want to connect to it only difference is that, you only have to change the JDBS_URL given as follows in the step 7.
     jdbc:h2:repository/database/WSO2CARBON_DB 

(You can skip the step 3 here as you know the to use the WSO2CARBON_DB 's JDBC_URL. Anyway if you want to know, this url is also defined in repository/conf/master-datasources.xml file, and if its default configurations are editted, you will have to see this file)

Browse H2 database of any WSO2 product using an external H2 client.

 Anyway if you don't like to edit any wso2 product configuration file, you can do that too using a external H2 client. So you do not have to edit the carbon.xml as described in step 2.

But there is a trade off in this method. It is, we cannot access the h2 database via this external client, while the wso2 product is running. We have to shut-down the server before accessing via this method. And note that the attempt of vise-versa ( trying to start wso2 product server, while we have connected to the wso2 h2 database via this external client) would fail successful starting of wso2 product as the external client locks the h2 database so that the wso2 product cannot access it.

Anyway keeping these facts in mind let's see how to do the task.

1. Download H2 Database from here https://code.google.com/archive/p/h2database/downloads
   (a latest version is preferred)
2. Extract zip file and execute the h2.sh in bin directory with terminal (start terminal from inside bin directory and run sh h2.sh)
3. The H2 web console will be automatically started in your browser.
4. Then give the,
  •  JDBC URL : jdbc:h2:/<WSO2_PRODUCT_HOME>/repository/database/WSO2CARBON_DB

    eg: jdbc:h2:/home/samithac/Repositories/product-bps-2/product-bps/modules/distribution/target/wso2bps-3.6.0-SNAPSHOT/repository/database/WSO2CARBON_DB

    Note that you have include the full path of the database directory here. (not just a relative path as we did before)
    (if you want to connect to wso2 bps's, activity database, just change above url's "
    WSO2CARBON_DB" part to "activity")
  • User Name : wso2carbon
  • Password : wso2carbon
5. Then Press connect & you are done..!!!


Friday, February 5, 2016

WSO2 Data Analytics Server (DAS)- Explained Simply & Briefly


  • WSO2 DAS is there to collect and analyze real-time and persisted (stored/not temporary) data (even large volumes of data) and produce ( visualize/ communicate) results.

  • It exposes a single API for external data sources to publish data to it.


    Data Collection

  • Event = Unit of data collection
  • Event Stream = Sequence of events of a single type.

  • One Event Stream should be created in DAS to provide structure required to process events. [DAS management console is well facilitated to do that :-) ]
  • The required and preferred attributes for the event stream can be defined there (id, values, properties)
  • If we want to analyze data in batch mode (not in real-time) we have to persist the event stream information. (If required indexing we ca configure that too :-) )

  • After creating the path (event stream) to receive data, we have to create an Event Receiver to catch the data from different sources.

  • A second Event Stream is required to publish the processed events of the, first event stream created. In this stream we can define the required information and analytic results which are needed to be outputted. (We may persist this stream too for the compatibility to batch processing )

  • Event publisher is needed to be created in relation to an event-publishing-event-stream  (the above second event stream) to publish processed and analyzed results to external systems.
  • Event simulator can be used to submit events to a event stream (above first mentioned event stream)

          Analyzing Data

  • We can configure any of the data event streams of DAS to perform analytics (Batch analytics / Realtime analytics / Interactive analytics )

    Batch analytics
  • We can perform batch analytics only when the event streams are configured to be persisted.
  • This WSO2 DAS batch analytics engine is powered by Apache Spark and so Batch Analytic scripts written in Spark SQL Queries could be used to analyze the persisted data and get results.
  • The specific Spark console provided in WSO2 DAS also can be used to run Spark Queries and get results.

    Real-time analytics

  • Real time analytics can be done using a set of specified queries or rules through a SQL-like Siddhi Query Language defined in an Execution Plan under Streaming Analytics.
  • For this, we should be publishing(submitting) events to the DAS at that time, because this is a real time analysis, but not a persisted data analysis. (Even simulator provided in DAS could be used to simulate event publishing) 
     
    Interactive Analytics

  • Interactive analytics are used to retrieve fast results through ad hoc querying of received or already processed data. But for this, we have to have indexed the related Event Stream attributes. Data Explorer under Interactive Analytics in DAS dashboard is used for tis task.

         Visualizing (communicating) Data

  • WSO2 DAS has provided a very easy-to-use customizable dashboard mechanism to visualize the data and results of the data analytics processes, via Analytics Dashboard in the Dashboard menu.
  • Various types of gadgets (bar charts/line charts/ arc charts/ line charts/map charts) can be added to the the dashboard to represent data for any preferred event stream.

    Following diagram illustrates an overview event flow of an example scenario in the WSO2 DAS, as we just talked about. (please note that here the names of the event receivers, streams,etc. are just taken for this example scenario)


    So this is the overall mechanism in WSO2 DAS in brief and anybody interested is welcome to try it out it. ;-)
    http://wso2.com/products/data-analytics-server/

Saturday, August 1, 2015

#Web Scraping #Beginner #Python

Hi all, I'm back with some other new area, #Web Scraping. This is actually not a new technology, but new for my blogging scope, and to me too at the time.. :-) 

The expected audience is beginners for web scraping, and also if you are a beginner for Python, the free ticket (to read this blog... ha ha...) would be precious. I would explain how to scrape a web site using a typical example and don't worry if you are not familiar with Python, believe me I would teach the most basics of Python here..yes, it is simple. Anyway I am also a beginner for Python and so comments and suggestions are highly appreciated.

[Web scraping is extracting useful information from a web site]
Following is the url of the web site (of www.imdb.com) I am going to demonstrate here.
It is taken by getting the "Most Popular Feature Films Released 2005 to 2015 With User Rating Between 1.0 And 10" via advanced search option in imdb. (To go to the Advanced search option click on the small drop down arrow at the left side of search button on the top of the home page of www.imdb.com. Then click on the "Advanced Title Search" link at the right side of the page under the heading "Advanced Search". Now u have come into the advanced title search page and so give the search criterias Title Type= Feature Film, Release Date= From 2005 to 2015, User Rating = 1-10 and hit on search. This will bring u to the latter url where we are going to execute our grand mission :-)  )


Above image shows the web page we are going to scrape.
And the source code of that web page can be accessed by viewing the page source. (If u are a chrome user just Right click and select "View Page Source") 
Ok. Now let's see how the scraping could be implemented using BeautifulSoup python library, in python.
The task is to get the details of all the movies including their title, genries, year, run time and rating.
I am not describing here how to configure python and BeautifulSoup and I hope you have done up to that point successfully.

Now let's dig into the code, which does the task.

ScrapeImdb.py
#from bs4 import BeautifulSoup
import bs4
from urllib.request import urlopen
#pass the URL
url = urlopen("http://www.imdb.com/search/title?release_date=2005,2015&title_type=feature&user_rating=1.0,10")
#read the source from the URL
readHtml = url.read()
#close the url
url.close()
#passing HTML to scrape it
soup = bs4.BeautifulSoup(readHtml, 'html.parser')

tableClassResults = soup.find("table", { "class" : "results" })
for row in tableClassResults.find_all('tr'):
    print("\n")
    title=row.find_all('td',{"class":"title"})
    for titletd in title:
        print("Title:"+titletd.a.string)
        print("Year:"+titletd.find(class_="year_type").string)
        genreClass=titletd.find(class_="genre")
        print("Genries:")
        for eachGenre in genreClass.find_all('a'):
            print("\t"+eachGenre.string)
        print("Run Time:"+titletd.find(class_="runtime").string)
        rating_rating=titletd.find(class_="rating-rating")
        ratingValue=rating_rating.find(class_="value")
        print("Rating:"+ratingValue.string)

I will describe the code line by line. Note that in Python blocks and statements are delimited by just the indentation, which is an unusual method among popular programming languages. So you won't see semicolons (;) or curly braces({,{) as most other languages. And note that line comments are started with # in python.
 
from bs4 import BeautifulSoup
This Imports the name 'BeautifulSoup' from the BeautifulSoup Module bs4. A module in python is actually a file where definitions (functions and variables) are stored. Another definition for a module is "A module is a file containing Python definitions and statements". BeautifulSoup is a class and it is definitely defined in the bs4 module. Anyway now from here u can use BeautifulSoup constructor directly.
from urllib.request import urlopen
Here the 'request' is a class and request.py is a python file in the 'urllib' module. 'urlopen' 
is a function and it is dirrectly accessible now as it is imported. urlOpen() function open 
the URL, which can be either a string or a Request object.
So two way of python importing are, 1- from moduleName import ClassName 2- from moduleName.className import functionName
 
soup = BeautifulSoup(readHtml, 'html.parser')
Beautiful Soup supports the HTML parser included in Python’s standard library, but it also supports a number of third-party Python parsers. Anyway we use here the html.parser. Here the BeautiFulSoup class constructor is called and it is given the arguments as the html file read from the given url previously and the name of the parser as string. And this return the BeautifulSoup object to the variable itsoup. Python is a Dinamically typed language and so we do not have to define a type for variables. Python automatically decide the type of a varibale at runtime.
Now we have a some kind of object which hold the html file we are scraping.
tableClassResults = soup.find("table", { "class" : "results" })
So now the task is to find the elements we want and extract information from them  
sequentially.In the source of the web page you can notice that there is only one <table> 
element which has the class as "results". Search results in imdb are actually in this table.
So the function find with above parameters, finds for a tag <table> having the attribute 
class with the value "results" and returns that <table> element.
for row in tableClassResults.find_all('tr'):
In the 'results' table each movie is described in separate <tr> elements. So now we have to 
extract these <tr> elements.
The find_all() method looks through a tag’s descendants and retrieves all descendants that matches the given filter. So calling find_all function on the tableClassResults object (which is now carrying a <table> element), with the argument 'tr' returns a list of all the <tr> elements in the <table> element.
So we are using for loop to iterate through all the <tr> elements returned and you can see the syntax for the 'for loop' is pretty simple. It is like the enhanced for loop (for each loop) in java. 'row' is the variable now that catches the <tr> element in each iteration.
So now we can grab the <td> element of the movie (that is in the row in current iteration) which has the class attribute as 'title' in which all the required details of the movie are containing. 
title=row.find_all('td',{"class":"title"})
Above is how it is done using find_all method. Though we use find_all method, the variable title is assigned a list containing only one <td> element, because it has only one such with class "title". But we used find_all method for the convenience for the next iteration.
for titletd in title:
This is how we iterate through the list title, even though it has only one item, for the convenience of accessing children tags in it.
print("Title:"+titletd.a.string)
Now we can directly retrieve the title(name) of the movie. A child tag of a tag can be directly accessed by using a period(.). The contents of that element is given by the string attribute. So here, the content text of the <a> element is returned by titletd.a.string
<a href="/title/tt0478970/">Ant-Man</a>
Note that writing on the standard output(console) is done by print function in python.
print("Year:"+titletd.find(class_="year_type").string)
titletd.find(class_="year_type"
This statement searches for an element with the class value "year_type" and its content text is retrieved by getting the string attribute(python object's attribute). Note the underscore after class (class_) and please don't forget it.
 All the next statements are similar to the ones I have described before. Anyway you should peek into the source code of the web page to understand this well. But for convenience I have added screenshots of relevant code parts. The first lines of the output too are displayed below.
So that is it...!!! You have scraped a web site. Now try to implement this in an advanced application.  
Output:
Title:Mission: Impossible - Rogue Nation
Year:(2015)
Genries:
 Action
 Adventure
 Thriller
Run Time:131 mins.
Rating:8.0


Title:Southpaw
Year:(2015)
Genries:
 Action
 Drama
 Sport
 Thriller
Run Time:124 mins.
Rating:7.9


Title:Ant-Man
Year:(2015)
Genries:
 Action
 Adventure
 Sci-Fi
Run Time:117 mins.
Rating:7.8